Is your afternoon getting kind of “draggy”?
It might help to get a new perspective on a schedule that’s getting old.
After that, how about some yummy fun to put a spring in everybody’s step?
Whether you are Grandma with your Silver Sneaker assisted living facility friends or Gramps and the grandkids, these easy food craft ideas will be as enjoyable to make as they are to eat.
Frontida Assisted Living Facilities such as Azalea Place in Kenosha provide you with posts like this one to help you live your best life.
Cookie on a Stick
You liked making sculpture cookies from the teatime post? You’ll love these artsy delights.
1. Mix your favorite sugar cookie recipe.
2. Divide the dough in several sections and blend in food coloring for three- or four-color options.
3. Chill the dough for an hour and preheat the oven according to your recipe’s instructions (probably 350° or 375° F.)
4. On parchment or wax paper and a little bit of flour, take a small ball of cookie dough and roll it into a circle or “pancake.” (Your cookie will spread when you bake it, so don’t start too big.)

5. Continue rolling more colored dough for even smaller circles, ovals, strips, triangles or “snakes.” Place them on your larger circle to make a “uniquely yours” design: maybe a cat face, a funny face, a daisy, or sun. You can pinch parts of the dough or even snip it with kitchen scissors for tiny scales or details.
6. When your design is just how you like it, insert a thick pretzel stick at the base of the cookie and gently press down on the dough to make sure it’s grabbing the stick.
(Note: You could also use a popsicle stick, but if you have friends who struggle with memory loss, keep an eye on them when they eat. They may get confused on what’s edible and what’s not.)
7. Refrigerate your masterpiece for thirty minutes more so your cookie won’t spread too much in the oven.
8. Carefully move the cookie with its pretzel to a cookie sheet and bake as long as your recipe calls for, probably 8-12 minutes. (It may require a little longer if you did a lot of layering, but don’t overcook. Watch your edges for that signature golden brown.)
Now your only question is wait till your cookie-pop cools down? or eat it while it’s warm?
Either way, the pretzel stick handle makes this cookie perfect for dunking—if you’re into that sort of thing.
Cookie Pizza (Giant Cookie)
If you’re one of those grandpas who likes to thrill your grandkids by sticking the whole cookie in your mouth at once, good luck doing that with this one.
1. Whip up your favorite chocolate chip cookie dough recipe (or chocolate peanut butter or oatmeal raisin or red velvet…). Yes, store-bought works, too. Just let it sit out for a few minutes at room temp. to soften.
2. Preheat your oven to 350° F.
3. Grease a pizza pan or large oven-safe skillet.
4. Press the cookie dough into the pizza pan until it covers the entire bottom equally. (You’re looking for about an inch thickness here.)
5. Bake on the middle rack for about 20-25 minutes until the edges are golden brown. (The center will keep cooking after you pull it out.)
6. Let it cool for thirty minutes, then decorate with whip cream, buttercream frosting, more chocolate chips, chocolate sauce, sprinkles, … or whatever your heart fancies.
Slice it up like a pizza and gobble it down.
Homemade Butter in a Bag
Now, Grandma and Grandpa, you may not be old enough to have had this as a chore when you were little, but you’re never too old to learn something new—or fun.
Yes, it takes some movement, but that’s okay. Exercise is good, and this can double as your upper body workout.
1. Pour cold heavy cream into a Ziploc bag with a clean marble. (No marble? That’s okay. It just makes it faster.)
2. For salted butter, add a dash of salt to the cream.
3. Seal the bag carefully and place it in another Ziploc, so you don’t end up needing to clean cream off the walls and ceiling. (A mason jar works just as well as the bag. It just didn’t have the nice “butter-bag” alliteration.)
4. Shake the bag. Not a little salt-shaker shake. Make it dance! In fact, why not throw on some music and act like the bag’s your maraca.
It’ll probably need fifteen minutes’ worth of jiggling. Pass it around the room so no one’s arm wears out. Of course, if you’re doing it with the grandkids, they might do all the work for you. 😉
5. When you have a large thick clump in the bag, carefully pour off the extra whey (the liquid part) that didn’t churn. Close up the bag again and give it a few more shakes.
What’s left is your freshly-made butter! Spoon it out of the Ziploc and into a dish.
Now, what to put it on?
Teddy Bear Rolls
I dare you to try making these little cuties without giggling like schoolgirls.
1. Preheat the oven to 350°.
2. Start with your favorite crescent dough. Yes, Pillsbury works. Just use the rectangle lines, not the triangles. (i.e. two crescent rolls per bear. Don’t gasp—you know no one can eat just one.)
3. Cut the dough as shown in the diagram, with rectangles for body, head, snout, ears, arms, legs, eyes, and just a little bit left over for whatever additions you dream up.
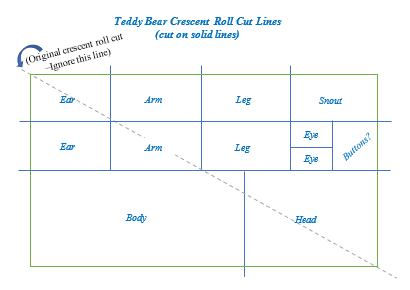

5. Roll the smaller rectangles for each body part and attach them together by pinching the dough at connection points.
6. Place the teddy bears on a cookie sheet and bake 15-20 minutes, with a 10-minute half-time check. If the top seems to be browning too quickly before the insides are done, give your teddy bear an aluminum foil blanket.
When they’re done, pull them out piping hot and smear that homemade butter on. (Goodness, is your mouth watering?)
Ice Cream Sandwich Cake
Guaranteed to be the easiest cake you’ll ever make. No cooking required.
Your ingredients:
- 24 Ice Cream Sandwiches
- Cool Whip (12-16 oz, depending on how thick you want it.)
- Ice Cream toppings (berries, sauces, nuts, canned pineapple, bananas, sprinkles,…)
- 9 x 13 cake pan
Your so-simple-a-caveman-could-do-it instructions:
1. Unwrap 12 ice cream sandwiches and place them single-layered in your pan. (Mine usually takes two rows of five and then one and three-quarters crosswise at the bottom. What happens with the extra quarter? Well, I won’t tell if you don’t.)
2. Spread half of the Cool Whip on top of the sandwiches until they’re completely covered.
3. Unwrap the other 12 ice cream sandwiches and place them as the second layer.
4. Spread the rest of the Cool Whip over them.
5. Drizzle on your sauces. (We love chocolate, caramel, and butterscotch). Add your berries, nuts, sprinkles.
6. Freeze your masterpiece until you’re ready to eat it.
And that’s it. (Told you it was easy. The hardest part is choosing how big a slice you want.)
Yes, You Can Have Your Cake (or Cookie) and Eat It, Too
Long after these goodies are gone, you’ll still remember the laughter that came from making them.
And, because each one has effortlessly endless possibilities, you may never have another “draggy” afternoon again.
Like these ideas and want more? How about ice cream in a can and teatime activities.
Want to live in a fun senior assisted living community where activities like this happen all the time? Check out Frontida senior living facilities.
Check out these other fun activities for Grandma and Grandpa.
Elizabeth Daghfal is a writer, teacher, speaker, and community volunteer. When she isn't teaching or writing-- Who are we kidding? Her husband and five kids say she's ALWAYS teaching and writing. She has a passion to help people who are struggling and is happy to say her shoulders are drip-dry. Born and raised in the South, she now lives in Wisconsin and loves it--except for the fifteen months of winter. Read more about her at elizabethdaghfal.com.